|
|
what it does and how to use it |

|
|
|
what it does and how to use it |
|
|
what it does and how to use it When an object is antialiased and merged with some background, the antialiased pixels have a color that is a varying mixture of the object color and the background color. This makes the object look like it has smooth edges. However, it presents a problem when we try to select the object so we can use it somewhere else. Basically, we have two choices.
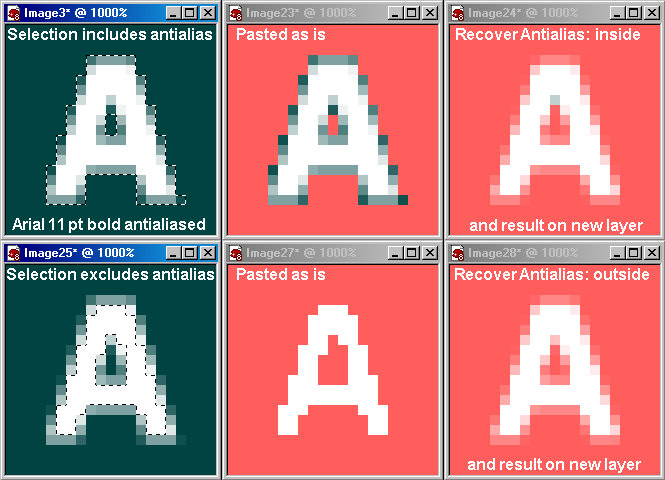
Neither one of these options is very satisfactory. The Recover Antialias filter is designed to deal with this problem by extracting the original antialiasing without any contamination by background color. The top row of AAra1.jpg shows a selection of both the A and its surrounding antialias region. If we just paste the selection as is onto a different background (center) we see the unwanted halo. However, if we run Recover Antialias specifying the Inside mode and a Result On New Layer, when we paste this result we lose the halo (right). Note that there is a slight error at the top of the hole in the A because at that point the antialiasing is two pixels wide and not one pixel wide as the filter expects. |
|
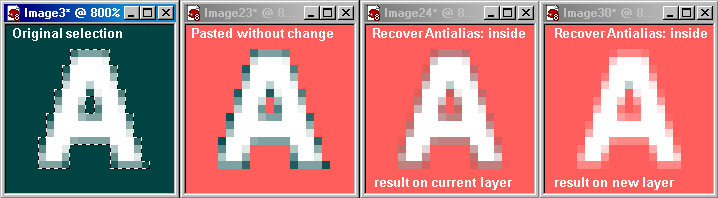
The bottom row of AAra1.jpg shows a selection of the A without including the antialias region. If we just paste the selection as is onto a different background (center) we have no halo but we get jagged edges. However, if we run Recover Antialias set to Outside and Result On New Layer, when we paste the result we get a nice antialiased edge that is not contaminated by any background color. The above examples make it clear why there is an Inside and an Outside setting, but what is all this Result On New Layer stuff? Image AAra2.jpg helps explain this. At left is the original selection of the A and its antialias region. The pane second from left shows the result of just pasting this selection. The next pane shows the pasted result of running the Recover Antialias filter without a new layer. The halo is reduced but not eliminated. On the right, with a new layer, we see elimination of the background color. The reason for these results is the following. The filter is a selection modifier. In pane three only the degree of selection at the edges has been modified. The color of the image cannot be modified just by changing the selection. In particular, the color can't be modified since PSP doesn't know if you want to use the selection or its inverse in a subsequent step and, anyway, the rule in PSP is that selections just select and never modify the image. So, without a new layer, after pasting the reduced degree of selection appears as partial transparency, and the halo is less visible but the original color of the antialias region is still there. When the result is on a new layer, any color we like can be assigned to the antialias region because we aren't affecting the original image. The bottom line is: for the cleanest edges always select the Result On New Layer option unless you intend to invert the selection later. If you need an inverted selection it is better to invert first and then run Recover Antialias with the result on a new layer. |
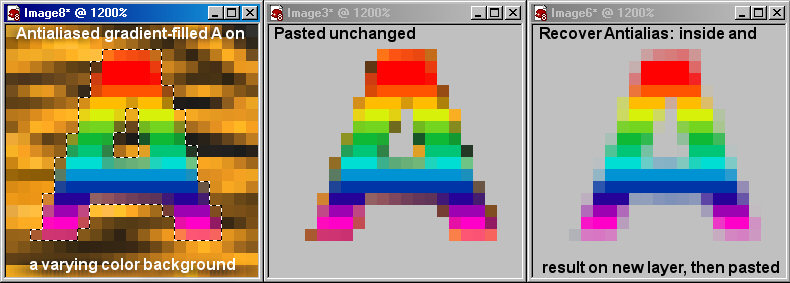
Experts among you might be saying at this point "Why do I need Recover Antialias? I can just paint white over the antialias region or use the Retouch brush in Color To Target mode." Here is where the beauty of the filter comes in. The filter pays careful attention both to the color inside the selection and in the pixels surrounding the selection as well as taking into account where these colors are relative to each other. Therefore, it does just as good a job when the selection has a complex color distribution and the background has a complex color distribution. Image AAra3.jpg shows an extreme example, where the letter A is filled with a rainbow gradient and lies on a patterned background. Simply pasting the existing selection shows a variety of colors in the antialias region (yellow, orange, brown, black, etc.) After Recover Antialias all that colored junk is gone. This result would be extremely difficult to achieve by hand since it would require tedious pixel by pixel editing.
|