|
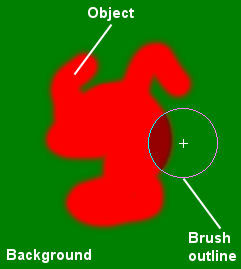
image 01 |
 Principles of operation Principles of operation The idea
of the Precision Background Eraser is this. You hold the center
of the brush over the background and overlap the edge of the
brush over the object. As you move the brush, the region at the
brush center samples the background and then the colors under
the brush are analyzed to remove background and leave object
behind.
To
make it easier to use the Precision Background Eraser switch on Show brush outlines on the Display and Caching
tab of File > Preferences > General Program Preferences.
The method
of positioning the brush is shown in the image above. A red object
lies on a green background. The center of the brush, shown by
the crosshair lies on the background, away from the edge of the
object. The brush size is sufficient to overlap the object. In
the example, the green background within the brush outline will
be erased, while the object shown darkened will
remain unerased. The normal brush operation is the selective
one just described. In addition, the brush has an unselective
or unconditional mode of erasing obtained by holding down the
Spacebar while using the brush. In this mode the brush will not
do any color analysis and will simply erase everything under
the brush in the same way as the regular Eraser. The most efficient
way to use the Precision Background Eraser is to run it around
the edges of your object to perform the difficult definition
of object edges, leaving the object with a surrounding band of
transparency. The remaining background far from the object can
then be erased quickly and completely using Spacebar with the
brush. |
|
What does erasing the background mean? Erasing means converting some image colors
to transparency. In Paint Shop Pro, only regular layers can have
transparency and this transparency can vary from none through
partial to complete. A background layer does not support transparency
at all and a paletted image such as a GIF does not support partial
transparency. Consequently, when you try to use the Precision
Background Eraser on such images you may see a message from Paint
Shop Pro informing you that the image needs to be promoted to
a full layer and that its color depth must be increased to 16
million colors. (Whether or not you see a message depends on
the settings on the Auto Action tab of File > Preferences
> General Program Preferences.) However, erasing is not
the only thing that the Precision Background Eraser does.
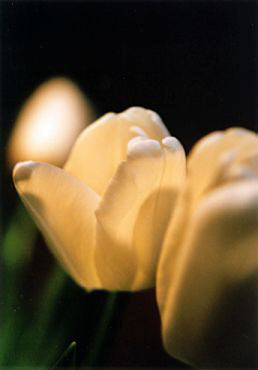
In the previous example 01 image, you
can see that the red object has a soft edge where the color is
some mixture of red object color and green background color.
If all the Precision Background Eraser did was just to erase,
the results would not be good for such an image. Either only
the green would be erased to leave a red object with a dark halo,
or the background and halo would be erased to leave the object
with unnaturally sharp edges. Accordingly, the Precision Background
Eraser does two things. First, it erases, and where there is
a mixture of object and background colors it erases only partially
to allow a soft edge. Second, in partly transparent areas it
subtracts the color of the background from that of the object,
leaving only background. This is called color unmixing
and is shown in image 02. |
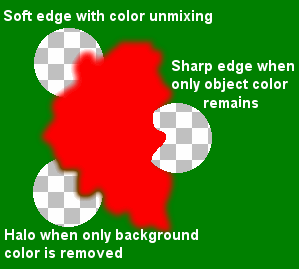
image 02 |
|
Because of this color unmixing, which
gives you pure object colors uncontaminated by background, the
colors in your image are changed. Unerasing the transparent areas
of your result image using the regular Eraser will reveal colors
that were never in the original image. Here is an example (image
03).
However, as long as
you are in a single session of the Precision Background Eraser,
the tool can keep track of the original image colors. Therefore,
if you unerase while in the Background Eraser you will always
get your original image colors back. Unerasing in the Precision
Background Eraser is done with the right mouse, just as for the
regular Eraser. Remember that holding down Spacebar while unerasing
will unconditionally restore everything under the brush, just
as if you were using the regular Eraser to unerase. For this
reason, you should never jump back and forth between the Background
Eraser and the regular Eraser. |
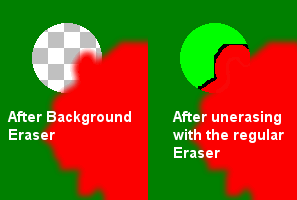
image 03
|